Sunday, July 22, 2018

Ravelry's Newest Index Feature is Pure Brilliance

Way back in 2011, when Ravelry only had 1 million users (it is, currently, approaching 8 million and should surpass that number sometime in August), Farhad Manjoo noted in this Slate article that Ravelry "... plays an important part in the way [my wife] practices her craft" (she both crochets and knits, I am happy to report). Applying this to myself, I wholeheartedly agree. For anyone who wants to know the current state of my yarn-based making, all they need do is look at my Ravelry profile, and it's pretty much there in black and white - what I'm discussing, the projects I'm working on, what yarn I'm using - all right in one clearinghouse except, of course, all the new and/or otherwise secret stuff.

So when Ravelry recently tweeted about a new index feature for anyone with 10 or more projects, my eyes perked up:


My most viewed project on Ravelry is the sample 
for the first design I ever worked up, thanks to 
Lyn Robinson's generosity in sharing a stitch 
pattern - the edging on my sample of the
 Festival Shawl
I was, of course, one of those people who originally missed the newest feature tab in my notebook. However, once I clicked on it, I can say it's now my new fun organizing tool. It also reveals my penchant for not using the same organizing/descriptive terms consistently. Because this index provides a snapshot of tags used as well as for whom you've made projects, I can confidently state I have found more than a half dozen ways to categorize making something for myself. The tool underscores the imperfection of language and punctuation.

I currently have 289 projects in my notebook, but this index has also shown me that number is somewhat lacking. I have had an inconsistent approach to adding samples I work up, but if I'd like my notebook to be a clear reflection of my making, then I will need to add those not currently in there. 

While I am no database junkie, I am a somewhat organized person - not too much to have a problem, but just enough to know the current state of most things in my world. I am super pleased with this latest Ravelry feature - just one more reason why I will never leave Ravelry, and despite some complaints to the contrary, Ravelry continues to grow in membership, I am not alone in my sentiments.

Tuesday, July 17, 2018

On Design: Rethinking (Perhaps) a Creative Life

In the Tulip Garden of Good and Acid, 2018, 9x12, acrylic on canvas
made as part of a prize package in celebration of over 300 followers
on my Instagram account
It has been approximately a decade since I originally picked up a paint brush, repurposed a neighbor's used canvas, and laid down my first strokes of acrylic. My designing career began a few years after that, and I have never looked back. I am truly proud of my ability to go beyond the small box into which family and society might want to place me. 

Nevertheless, I have throughout this period always had a day job. I refuse to discuss that job in public spaces for many reasons. I have never, however, felt that having a day job was incompatible with my creative life. Actually, I find the latter helps and informs the former, but that is a whole 'nother blog post. 

The subject is top-of-mind because of this recent post on the Craft Industry Alliance's blog and a subsequent discussion thread on Ravelry in one of the designer groups. In the article, one person discusses her evolution from trying to find financial success solely in the gig economy (defined in Google's disctionary as "a labor market characterized by the prevalence of short term contracts or freelance work as opposed to permanent jobs") to a transition to a full-time teaching job, with a side of creative. The author notes at the end that she has no intention of giving up her creative life, and has new projects in the pipeline. I get where she is coming from.

Additionally, I took some (rather unwarranted, I felt) heat in the Ravelry discussion for refusing to box all creatives into one of two categories (arbitrarily set by Bob-only-knows-who): those who create/design for reasons other than money, and those who do it solely to be monetarily successful. Personally, I find this dichotomy to be so much bull crap. Anyone who knows me will see this next statement as pure Voie de Vie - I find it is about choice. In this 2016 McKinsey Global Institute report, the authors put gig economy workers into one of four boxes, with one of the main qualifiers being choice vs. necessity. (Personally, I still find this rather limiting, but I digress.)

I am truly grateful for my creative life. It has positively factored into my living wages for several years now. It can be difficult, however, to sustain fidelity to my own creative vision (which, admittedly, continues to evolve) in the face of pressure, subtle or otherwise, to just monetize the hell out of every little thing I do. I find that approach muscularly white-collar and business-centric. That is not why I initially picked up that paint brush almost a decade ago. It did not animate me then. It will not inspire me now.

I hope you stay tuned to see what is inspiring me. Things are planned between now and the end of the year. It's been a busy 2018 so far (13 new designs, 1 new painting, another curated summer collection), and I could not be more thrilled, no matter how many feet I have planted in the gig economy.

Sunday, July 8, 2018

Maker Tutorial: Bag Linings for the Anti-Sewer

My Buds Bag, one of several I
have designed that function
much better with a lining.

Here's a tutorial I wrote for ILikeCrochet.com several years back. I have reprinted it in my A La Maison 2 e-book, but just recently focused on the fact that I have not put it up here on the blog. Well, I am now taking care of that oversight. 

    **************************************************************

I am the anti-sewer. Really. Yet, I appreciate the structural as well as aesthetic value of a well-made and well-placed seam. Additionally, I love to design, make, and use bags, many of which benefit from a fabric lining.

So, for all of you crafty folk out there in to the same anti-sewing camp as me, this quick tutorial on how to create a bag lining will, I hope, speak your language. If you’ve ever constructed a crocheted garment and seamed it with a back stitch or whip stitch, or put together a motif-based blanket, you’ve already got most of the bag-lining basics in your crafty techniques toolbox.

Initially, lining your crochet bag project serves a few important purposes: (1) it will provide additional support and safeguards to the seams in your crochet fabric; (2) depending on the stitch pattern of your crochet fabric, it will allow you the ability to carry small things in your bag without fear of losing them; and (3) it will provide additional aesthetic value to your handiwork.

In the Buds Bag design used for illustration purposes, I used store-bought fabric. Don’t, however, limit yourself to fabric bolts. Bag linings are a great way to re-use/upcycle all kinds of fabric bits around your house: an old fabric pillow covering, silk, cotton and/or polyester blouses that perhaps have seen better days or no longer fit, pajamas (especially silk or polyester), and of course old jeans (assuming they contain a section big enough for a lining that is hole-free).

Once you’ve identified your fabric source and have completed the crocheted portion of your bag, creating the lining is fairly straightforward. I am using an easy rectangular-shaped bag as my example – if you have a more complicated bag shape then some further effort may be necessary.

1.  Cut your fabric to your bag’s dimensions, adding an additional ¾” in width and ½” in length. The additional width will allow for ¼” seams on each side plus some additional ease to allow for your crochet fabric to slightly stretch, as well as a generous ½” seam allowance at the top. The fabric lining’s job is to reinforce your crochet bag’s structure, but the crochet fabric is always responsible for the shape of the bag. Items should rest within the shape of the crochet fabric with the lining filling all of the bag’s shape with no gaps. While I measured my fabric with ruler and pencil, you can also place your bag on the fabric and trace its outline, allowing for the above-mentioned additional width and length.

Above: measuring fabric; at right:
the cut fabric. Note the bottom is 
actually the fabric’s fold line.


2. Once your lining is cut, turn wrong side out and pin your side seams ¼” from each side edge.


3. Alright, here’s where you’ll need to start sewing – however, think of this as seaming two motifs together, because the principle is basically the same.  Thread your needle with thread and knot the end; then, start at the bottom of one side and work a back stitch seam, following the line of your pins. 


4. Once you have seamed both sides of your fabric, turn the lining right side out, turn your crochet bag fabric wrong side out, and slip your lining over the crochet fabric.


 5. Now, you have just one more bit of sewing to go: the top edge seam. Turn the top of your lining fabric in, between the wrong side of the lining and the crochet bag, aligning it with one of the top rows of your crochet bag. For the Buds Bag, I lined the fabric up with the bottom of the reverse single crochet edging row.


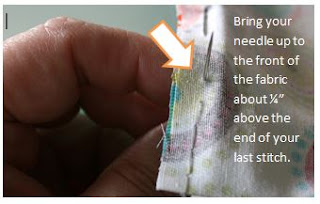
6. Thread your needle and seam your lining to the crochet fabric with a stitch whose mechanics are similar to a whip stitch – place your needle from back to front of the crochet row and then back to front of the lining fabric, keeping as close to the top of the lining fabric edge as possible.


7. Once you remove the straight pins, you’ll have a seam that is surprisingly invisible.


8. Then turn your bag right side out, add any handles and/or closing notions necessary, and then admire your tremendous handiwork.


I hope this little tutorial will be helpful. Now get out those hooks and whip up some fun bags, complete with nifty linings, all for your very self.

Tuesday, July 3, 2018

On the Meaning of Independence

Voie de Vie designs from the multi-designer curated Women & Water 
summer collection, clockwise from top left: Stars Align bracelet, So Much 
Shine necklace, It's About Time Watches, Lake Ontario Shimmer, and When 
Coco Met Elsa bags, all available for purchase (along with over 60 other 
original designs), in my Ravelry pattern store.
As everyone here in the U.S. prepares for various July 4th events, I thought it appropriate to take stock of what independence actually means to me.

There is no doubt to anyone who reads this blog regularly that independence is one of my running themes. I have, also, marked past Independence days in 2012, 2013, 2014, and just briefly in 2016. It is, nevertheless, difficult to pin down with any specificity how to define independence. I am an indie designer who also designs for third party publications when the design spirit moves me and those publishers smile favorably. I have my own small independent creative business, yet throughout this time I have held a day job. So is this independence, or just following many masters?

While I definitely would like to cut down on the masters, I have never had any illusion that my small creative business would ever be my sole means of income, so the multiple people to whom I must answer was pretty much a foregone conclusion. No, what independence means to me is an evolving ethos in my creative business - only working on those designs and projects that truly move me. As a result, you will note all the jewelry and bag designs above (and there is still one more design I am so close, albeit late, to finishing for the collection). I genuinely love both, even though they are not usually the cash cows that most shawls and cowl designs tend to be. I have things in the pipeline for later in the year (both from me and from third party publishers) that truly mean something to me - either the subject matter, or the concept, or the design. I cannot know whether or not they will be popular, but each of them will exercise my own flavor of independence. 

As a certain portion of the world has already or will mark an independence holiday this month, I hope each of you find your own independence sweet spot. 

Oh, and don't forget to include all the tasty food.